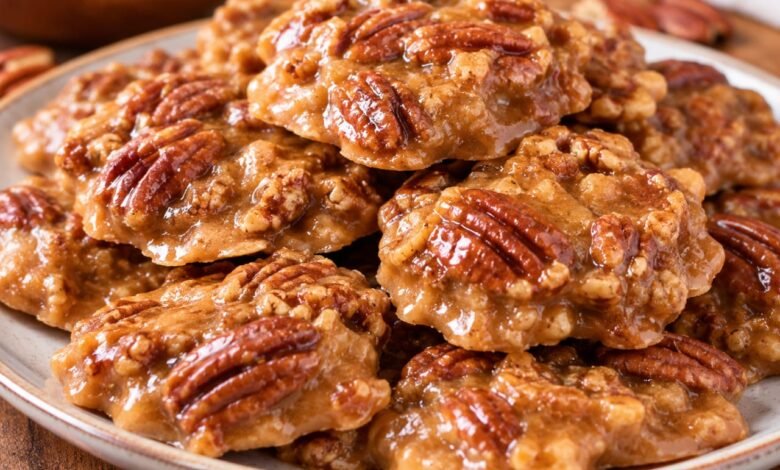
Sweet and buttery pecan pralines are a classic Southern candy made with toasted pecans, brown sugar, cream, butter, and vanilla. Each piece has a rich, nutty flavor and a delicate texture that is sweet, creamy, and slightly crumbly.
These homemade pecan pralines are perfect for holiday dessert trays, homemade gifts, or a little something sweet after dinner. The ingredients are simple, but a few details make a big difference: prepare your baking surface before cooking, use a candy thermometer when possible, and work quickly once the mixture begins to thicken.
Why You’ll Love These Pecan Pralines
- Rich, buttery flavor: Brown sugar, cream, and butter create a caramel-like sweetness.
- Plenty of pecans: Toasting the pecans first brings out their nutty aroma.
- Great for gifting: Once completely cooled, the candies can be wrapped individually or arranged in a gift box.
- No oven required for the candy: The mixture cooks on the stovetop and sets at room temperature.
- Easy to customize: A little vanilla, a pinch of salt, or a touch of cinnamon can add extra flavor.
What Are Pecan Pralines?
Pecan pralines are a traditional Southern confection made by cooking sugar with a dairy ingredient and butter, then combining the mixture with pecans. The candy is portioned onto a prepared surface and allowed to cool until set.
Unlike a hard caramel candy, a classic creamy praline should have a tender texture that breaks apart easily. Depending on the recipe and technique, pralines may be creamy, slightly grainy, or more crumbly.
Ingredients You’ll Need
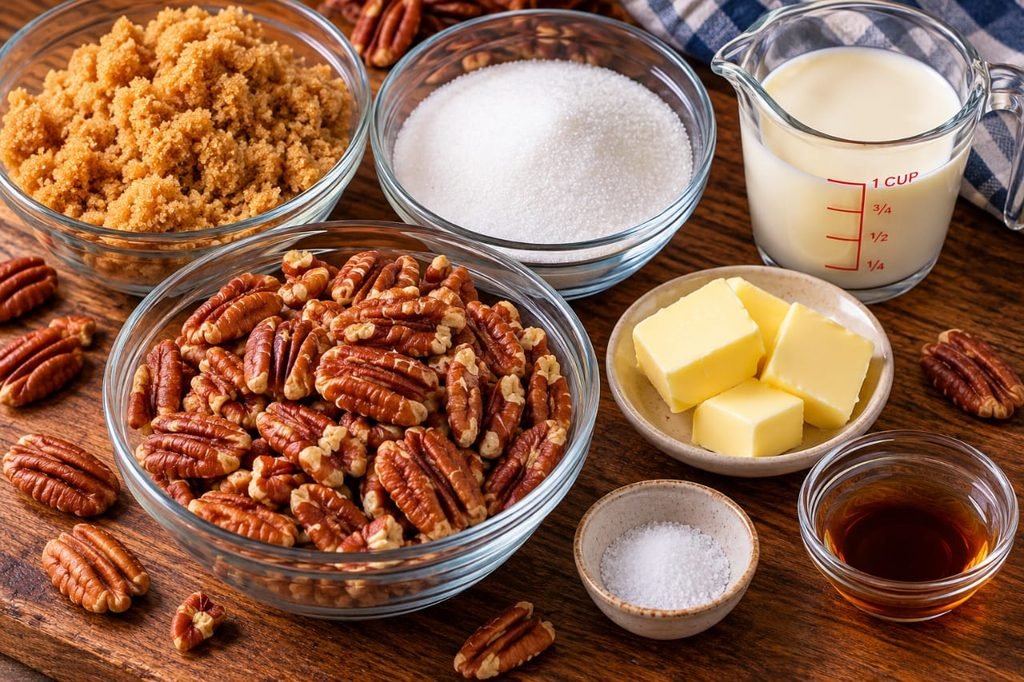
- 1 cup packed light brown sugar: Adds a deep caramel flavor and helps give the candy its characteristic color.
- 1 cup granulated sugar: Helps the mixture set into individual candies.
- 1/2 cup heavy cream: Creates a rich texture.
- 4 tablespoons unsalted butter: Adds buttery flavor and richness.
- 1 1/2 cups pecan halves or large pieces: Toast them lightly for the best flavor.
- 1 teaspoon vanilla extract: Adds warmth and rounds out the sweetness.
- 1/4 teaspoon salt: Balances the sugar and enhances the pecans.
Equipment for Making Pralines
- A heavy-bottomed saucepan with plenty of room for the mixture to bubble.
- A candy thermometer for checking the temperature.
- A sturdy wooden spoon or heat-resistant spatula.
- A baking sheet lined with parchment paper.
- A tablespoon or small cookie scoop for portioning the candy.
A candy thermometer is strongly recommended because a small temperature difference can change the final texture. Keep your hands and face away from the hot sugar mixture, which can cause serious burns.
How to Make Sweet and Buttery Pecan Pralines
Step 1: Prepare the Baking Sheet
Line a baking sheet with parchment paper and place it on a flat, heat-safe surface. Measure all the ingredients before starting. Once the candy reaches the correct stage, you will need to work quickly.
Step 2: Toast the Pecans
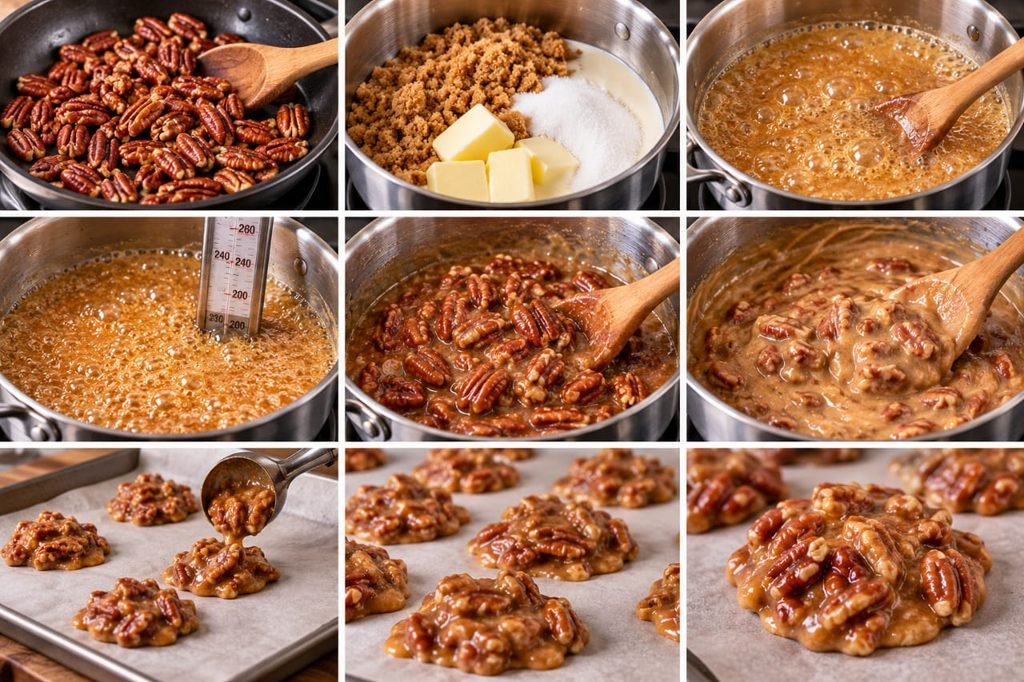
Place the pecans in a dry skillet over medium-low heat. Stir frequently for about 3–5 minutes, until fragrant. Transfer them to a plate and let them cool slightly.
Watch them carefully because nuts can burn quickly. Toasting is optional, but it helps develop a deeper, nuttier flavor.
Step 3: Combine the Sugar, Cream, Butter, and Salt
Add the brown sugar, granulated sugar, heavy cream, butter, and salt to a heavy-bottomed saucepan. Heat over medium heat, stirring gently until the butter melts and the sugars begin to dissolve.
Once the mixture reaches a steady boil, attach the candy thermometer and monitor the temperature closely.
Step 4: Cook to the Soft-Ball Stage
Continue cooking until the mixture reaches approximately 236–240°F (113–116°C). Stir as directed by the recipe and keep a close eye on the thermometer as the mixture approaches the target temperature.
The soft-ball stage is important because it helps determine whether the pralines will set properly. If the mixture is too cool, the candies may remain sticky. If it gets too hot, they may become dry or crumbly.
Step 5: Add the Vanilla and Pecans
Remove the saucepan from the heat. Carefully stir in the vanilla and toasted pecans. The mixture will be extremely hot, so avoid splashing it.
Step 6: Let the Mixture Thicken
Allow the mixture to rest briefly, then beat it with a sturdy wooden spoon until it becomes thicker and slightly cloudy. This stage requires attention: the mixture should still be soft enough to spoon onto the prepared baking sheet.
If you stop too early, the pralines may spread and remain sticky. If you continue beating for too long, the candy may harden in the saucepan before you can portion it.
Step 7: Shape the Pralines
Working quickly, drop tablespoon-sized portions onto the parchment-lined baking sheet, leaving space between each candy. If the mixture begins to stiffen, stop briefly and assess its texture rather than continuing to beat it.
Step 8: Cool Until Set
Leave the pralines at room temperature until completely cool and firm, usually around 20–40 minutes depending on their size and the room temperature. Do not move them while they are still soft.
Tips for Perfect Pecan Pralines
- Use a thermometer: It is more reliable than judging the mixture by color alone.
- Prepare everything first: Have the pecans, vanilla, spoon, and lined tray ready before cooking.
- Choose a heavy saucepan: It helps distribute heat more evenly and reduces the risk of scorching.
- Be careful with humidity: Very humid conditions can affect how quickly sugar candies set.
- Watch the texture as you beat: Stop when the mixture thickens and becomes less glossy, but can still be spooned.
- Work quickly when portioning: Praline mixture can set rapidly once it begins to cool.
- Keep children away from the pan: Hot sugar is much hotter than boiling water and can stick to skin.
How to Fix Common Pecan Praline Problems
Why Are My Pralines Too Soft?
The mixture may not have reached the correct temperature, or the candies may need more time to cool. Let them set completely before deciding whether the texture is wrong. If they remain sticky, review the cooking temperature and thermometer accuracy for the next batch.
Why Did My Pralines Turn Grainy?
Sugar crystallization can cause a grainy texture. Avoid unnecessary splashing of sugar crystals down the sides of the pan, and follow the cooking and stirring stages carefully. Different recipes use different techniques, so avoid changing the method midway through cooking.
Why Did the Mixture Harden in the Pan?
The mixture may have been beaten too long or allowed to cool too much before portioning. Prepare the tray in advance and begin shaping the candies as soon as the mixture reaches a thick but workable consistency.
Why Did My Pralines Spread Too Much?
The candy mixture may have been too hot or too thin when portioned. Check the final cooking temperature and allow the mixture to thicken slightly before dropping it onto the parchment.
Easy Pecan Praline Variations
- Salted pecan pralines: Add a tiny pinch of flaky sea salt to each candy before it sets.
- Vanilla-forward pralines: Keep the vanilla in the recipe for a classic, warm flavor.
- Cinnamon pecan pralines: Add a small pinch of ground cinnamon for a cozy variation.
- Extra nutty pralines: Toast the pecans before adding them to the sugar mixture.
How to Store Pecan Pralines
Allow the pralines to cool completely before storing them. Place them in an airtight container in a cool, dry place, separating layers with parchment paper if needed. For best texture, keep them away from heat and moisture.
Enjoy them within about one week for the best quality, and check their texture before serving. If your kitchen is warm or humid, refrigeration in a tightly sealed container may help, although condensation can affect the surface when the candies are brought back to room temperature.
Can You Freeze Pecan Pralines?
Freezing may be possible, but it can change the texture or create condensation when thawed. For gifting or serving guests, freshly made pralines generally offer the best texture. If freezing, wrap the completely cooled candies well and thaw them while still wrapped to reduce moisture forming on the surface.
How to Serve Pecan Pralines
Serve these candies on a dessert tray with coffee or tea, package them in small gift boxes, or crumble a piece over vanilla ice cream. They also make a lovely addition to a holiday cookie assortment or a homemade Southern-inspired dessert basket.
Frequently Asked Questions
Do I need a candy thermometer to make pecan pralines?
A thermometer is strongly recommended because the final temperature affects how the candy sets. Experienced candy makers may use the cold-water test, but a thermometer is usually more consistent for beginners.
Can I use chopped pecans instead of pecan halves?
Yes. Chopped pecans work well and make the candies easier to bite. Keep the pieces relatively large if you want a more noticeable nutty texture.
Can I make pecan pralines without heavy cream?
Other dairy ingredients appear in different praline recipes, but changing the cream can alter the moisture and fat balance. Use the ingredient specified in this version for the most predictable result.
How long do pecan pralines take to set?
They often need around 20–40 minutes at room temperature, depending on their size, the final cooking temperature, and the humidity. Wait until they are fully cool before packing them.
Are pecan pralines vegan?
No. This recipe uses butter and heavy cream, so it is not vegan.
Can I double the recipe?
Candy recipes can be sensitive to batch size because a larger volume heats and cools differently. For more predictable results, make separate batches until you are comfortable with the technique.
Final Thoughts
Sweet and buttery pecan pralines bring together toasted pecans, rich dairy, and caramel-like sweetness in a traditional Southern candy. The key is careful temperature control, the right consistency before shaping, and a little preparation before the sugar mixture begins to cook.
Make a batch for a holiday dessert tray, share it as a homemade gift, or enjoy a piece with your favorite hot drink. Once you understand the stages, the process becomes easier to manage.